
Part One:
In The Beginning
The WordPress development stack for creating web sites, apps and services is filled with endless online tutorials and well crafted documentation for us to consume. But since our readers are coming from the visual creative side of the spectrum; I wanted to publish a series of articles looking at WordPress from a more holistic point of view first. With subsequent updates covering essentials plug-ins, themes, install options and CMS(content management system) for B to C markets.
Thus giving birth to the DIY Wordpress series. A comprehensive overview exploring the practices and principles behind one of the most popular CMS systems today; powering 22% of all web traffic. While exploring design workflows for using WP as a front end tool for building Line On Paper. An upcoming magazine project from CTTDC.
In part one of the DIY series, we focus on WordPress discovery and my original thoughts and pitfalls while trying to build a testing environment. Using a basic hosing account (circa 2008) with Bluehost. Describing the key differences between a (.com vs .org) flavors of WP including resources and further tutorials to get you up and running. I hope to instill just a few concepts which will hopefully guide you towards a better reasoning and understanding behind WP best practices, modules and extensive visual framework tools and services.
And as a general goal for the reader, it is my intention to showcase WP usefulness if you are coming from a design agnostic or content producer side of the universe. Or if you are completely new to web design and find yourself in dire need of creating a web project fast, cheap and lean.
Discovering WordPress:
The First 100 Days
I began working with WP after learning HTML and CSS while trying to figure out the best solution for creating a comprehensive survey of my work as a visual artist; back in the Fall of 2008. During the cave days of web development; I was stuck for a while using RapidWeaver. A “what you see is what you get” Mac OSX style app for creating basic and static XHTML transitional pages with a few but limited dynamic blog pages. RapidWeaver seemed perfect at first glance but as I began to work sorting extensive images, layouts and landing pages; the program was often buggy, slow and limited. Not to mention the software lack of collaboration services and modifiable code based templates. One of the most powerful features of any WP installation is the ability to see your site’s front and back end within multiple tab views of any browser. Armed with a basic hosting account, an FTP client and the latest version of WordPress at the time, I proceeded to install it using Bluehost CPannel web interface within PHP My Admin. We shall cover these topics in greater detail as the series progresses. Having the capability to change and modify the look and feel of any template on the fly and see the results with a simple browser refresh its the reason I adopted WP and began the long roadmap training as a developer. The backend (see figure 1-1 below) is where your Dashboard, Store, Post and Pages reside and its the central module for developing your content. (In Part Two Of The DIY Series; I Will Show You The Anatomy Of A WP Install) including instructional material to get you started. The front end( see figure 1-2) is the aesthetic window to the world and what is seen by the general public when your web site is published.


You will spend a great deal of time adjusting, editing and re-organizing the WP back end in conjunction with a theme, menus, media and other important elements within the dashboard.
I know first hand how daunting web design might seem for some of you who are content creators and site owners. Not understanding the tools, services and ways around a project can leave some with endless hours of frustration and malice of the tongue. It is my intention to arm you with a basic understanding of what WordPress is before we get started with specific details as a way of easing any fears or misconceptions behind using WP as a stand alone product for your business or home. And getting rid of an old age misconception of picturing WP as a blogging tool which is clearly not the case as we delve deeper into content design management systems, web development and DIY best practices.
WordPress is a visual publishing framework for developing and designing modern web sites, web apps and services. Centered around the idea of using ready made templates which are custom built to fit your needs depending on which flavor of WP you might install, (More on the flavors of WP a bit later.) Themes and plug-ins are created by folks such as myself; developers with a passion for open source software and with a willingness to share and sell our creative projects within the WP community. We will cover themes in depth a bit later in the series but for now, think of themes as the decor sitting on top of your front end installation. Themes is what sets your site apart from the rest of the population and a great theme can and should adjust to your content needs. Within the visual framework of each theme appearance modules is the ability to change fonts, layout, CSS while adding both static and dynamic blogs and pages of the fly. Making it an ideal product with a short learning curve for those of you who are site owners, content creators, print designers, photographers and visual artist who currently use Facebook as your only web presence. Specially so if you are design agnostic and lack the budget of a large design studio or agency with short promises and only big fluffy ideas.
There are two sides or flavors to any WordPress installation: (.Com & .Org) as its referred by the community at large. WordPress.com is a cloud based solution hosted by Automatic; (the company behind the WordPress project) and its a quick and technically free approach to easily get started on your web site or blog. With simple and ready made theming, plug-ins and custom URL store options for adorning and customizing every aspect of your project needs (Available only on a .Com account). And as I will explain in detail on part two of the series, within the capabilities and limitations of a (.com) account to see if these particular version is right for you. As we cannot add plug-ins to a (.com) account and other related extendable tools found within a (.org install). I will also explain why having a Worpress.com version is necessary even if your opting to use a self hosted installation method. One of the best aspects of using WordPress.com is being inside a social ecosystem in relation to bloggers and related content information such as the WP reader. And lastly, an added benefit of a (.com) account is not installing WP using FTP to a server as Automatic handles the hosting for you. Which may be adventurous to do so if you’re a complete virgin to any kind of web design/development penetration; as I was back in the Fall of 2008.
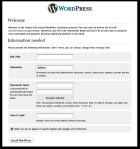
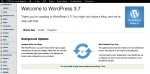
With WordPress.org things shift slightly towards self installation on either a live server using an FTP (file transfer protocol) client or a local Mamp development stack using your own web server. Within the (.org) universe you’re free to experiment, break things and put them back together to see how WP is comprise by taking a look at core files. You can download the latest version of WP by visiting (http://wordpress.org/download), extract the archive file and then upload the core files within the WP folder to the place where you want to install it using FTP. This method is often called the “famous 5 minute install” or guided method format. For example, if you want to install WP on (soccermoms.com); you just upload the WP files to the root folder within your (public_html directory) for (soccermoms.com). Then, point your web browser to the install directory which would be (http://www.soccermoms.com) in this example and provide the requested information (as shown in figure 1-3). You’ll need your database name, username and password and possibly also the address to the database server if you or your host have an external address. The good folks at either MediaTemple or BlueHost will supply this information once you open an account with them should you choose to go down this path. If you’re a bit confused by the esoteric technical jargon, fear not! as in part two we will extensively cover them in glorious detail. For now, see (figure 1-4) for a quick overview of the WP Dashboard for a self hosted installation as the module options differ quite a bit from that of a (.com install)
It only takes 5 minutes or less to install WordPress on a dedicated hosting account or your own web server using a local development stack (Mamp)
In short I simply had a ranging desire to take you on a small journey towards teaching those of you who might not clearly understand how to begin designing, adjusting and modifying your own web projects using WordPress. In hope of guiding and steering a clear path towards understanding and ethically communicating best practices and methodologies. At this point, you should have a basic understanding of the two basic flavors of WordPress, what kind of platform it is and how to get started right away should you need to. Furthermore, I want to leave you with a basic principle in mind as a way of conceptualizing the basic difference between (.org vs .com)
When you sign up for free to WordPress.com, in principle you are renting from a gracious landlord. In this case the property owner is Automatic which provides you with basic services and the ability to upgrade your apartment but with limitations.
These (.com) restrictions include the ability to add plug-ins and themes from third party vendors such as Themeforest. In part two and three of the series we will explore in detail why installing third party themes is crucial for developing your own templates and plug-ins if you are interested in becoming a WordPress freelance developer.
With a (.org account) modifying your templates behavior while adding third party functionality becomes extremely extendable as you are within the domain of home ownership with full control of your web site files, themes and third party plug-in services. And as you are installing WP using FTP to a hosting server or a local server environment on your computer; the added capabilities for installing framework services such as PageLines sits within your grasps.
PageLines: PageLines is a powerful web site development stack with customizable drag and drop features.
As a general rule of thumb it should be noted of making sure your server meets the minimum requirements for installing WordPress. These include PHP 5.2.4 or higher and MySQL 5.0 or higher inside an Apache Linux server for better scalability performance. In part four of the series, I will show you a few other methods of installation using a local development stack with Mamp and a cloud base install using Heroku.
Next Steps
The Site Development Process | Resources
In part two and four of the DIY series, we will begin our detail tour and anatomy behind using WordPress. In addition to exploring the Codex as a living depository for learning how to customize themes, add and modifying plug-ins with guided examples for beginner to intermediate levels. In part three of the series, we take a look at developing Line On Paper.com as part of an ongoing practice of creating a lean startup company with hopes of raising capital for building CTTDC. And we also take at look behind developing WP beyond blogging and towards the idea of Content Design Management System. Using Line On Paper as a basic case study project.
As a homework assignment I want to encourage you to read and brush up on the resources below as a way of getting you ready for parts two, and four of the series; which will cover DIY guides and best practices. As they are intended to built upon one another as building blocks of development for the creative professional, visual artist, content site owner and your everyday design agnostic fellow wishing to elaborate and learn.
Assignment (A)
Creating A Focused Diagram For Your Content
Regardless of your skill level, web sites come in all shape and sizes–from a single page resume to mega sites conducting business for worldwide corporations and everything in between. The site development process involves the same basic principles as outlined below and are the foundational assets behind content design.
- Conceptualize and research
- Create and organize content
- Develop the look and feel
- Produce a working prototype
- Test it
- Launch the site
- Maintain
For the purposes of learning WordPress using our DIY method, I want you to focus on the first two concepts of the bulleted list for the assignment homework. Conceptualize what your vision is for creating a web site and organized your text copy, images and resources as you go about the process of researching. The remaining areas of the bulleted list will be explained in detail thought the series. Get it on paper, tablet, laptop, smart phone or what ever tool you feel most comfortable using.
Assignment (B)
Resourcing The Codex
If you’re interest with WordPress lies within theme management and development within a professional to consulting setting. It will become extremely important to grow a steady diet of useful technical information on web development in an effort to reach these goals. I have been working with WordPress since 2008 and began training towards becoming a developer of themes and plug-ins since 2011. Cheers to Mr.Morton, Lynda.com, NobleDesktop and the WP Meet Ups for taking me under their respective wing as a humble “paddle one”.
WordPress, as a system, is based on documents written in the XHTML scripting language. XHTML 1.0 (which is currently the most widely supported version and stands for eXtensible Hyper Text Markup Language) became a W3C recommendation in the year 2000, and was intended to serve as an interim technology until XHTML 2.0 could be finalized.
I would advise to begin using WordPress A.S.A.P on either a (.com or .org) account before we publish part two of the series in two weeks time. As a way to get a quick jump start as a beginner and feel more comfortable using the platform. While the learning curve is a short one, there are several areas which may and will confuse when trying to modify and adjust child themes and modifying theme settings and header options. Which we will cover in parts two and four of the series as I have outline in the essay.
A real simple explanation on how to go about using FTP clients after you acquire a basic hosting account for installing the open source version of WordPress. An essential option for learning how to develop themes and plug-ins.

Leave a comment